|
Installation
instruction (updated on
17-03-08)
Connecting to the
WSMS system is simple but
involves some basic web programming knowledge. Nothing
exceptional or complicated. If you follow the procedure
described here you will not even need any prior knowledge.
Basic understanding of HTML and JavaScript is a plus. Do
remember our system needs a browser that supports Java and
JavaScript, most of the modern browsers do !. If your or
your client browser do not support Java we suggest to add
a plug-in from SUN. A good link with lots of data can be
found at >
Notes on
using Java applets in browsers.
Connecting your web site to
our system has two parts, client side at your own web site and support
side at your own PC.
-
At the client side you need to add a
small JavaScript to one or all your HTML, PHP or what
ever page type you have.
-
At the support side, download the windows
application and install it in your PC. To get the latest
version go to our download
page.
Client side setup
(web pages)
The following instructions are
for a simple HTM/HTML file. If you use another file type
say PHP, ASP... please consult your webmaster.
-
If not done so already, start
with registering to the
system. At the last step of the registration process
you will be assigned a unique
Client ID. This
Client ID is used in the
scripts examples here below and in the support side software
configuration. As part of the last step in the
registration process a small JavaScript will be created
with your new ClientID. Copy this small JavaScript to a
temporary file for later use. The
Client ID is used like a phone number.
-
Copy the JavaScript that at the top of your HTML web page between the
<head> and the
</head> tags. The script
with your own Client ID
is created for you at the last step of the
registration process. In order to avoid problems with
the client chat window size etc, please do not change
the scrip beside the Client ID
and/or mail address. If you need to make changes
do that only if it is necessary
and you know what you are doing!. The script example
showed here below is a general example. You can use this
example but you will need to update the ClientID, e-mail
address etc...
-
In your HTML page between the
<body> and
</body> tags add an OnClick
event that calls the above JavaScript function. The
OnClick event can be added to an image, text or any
other link that you choose. In the examples here below,
the call to the above script is marked in red.
See the following examples:
Note:
the following examples are divided into more then one text
line due to their length. It is preferable that they will
be in one text line in your HTML code.
|
Simple
OnClick event related to an image: |
|
|
The following
example loads "2_computers_2.gif"
image
from a directory named "images". If you have a
different location for your images do not forget to
change the directory name. |
|
|
<img border="0"
src="images/2_computers_2.gif" style="cursor:hand"
onClick=
"javascript:LoadChat();" width="107"
height="35"> |
|
Simple
OnClick event related to a text string: |
|
|
The following
example puts a text string and relates the OnClick
event to it. |
|
|
<font color="#FF0000" size="2"
style="cursor:hand"
onClick="javascript:LoadChat();" Call
Support, if not available leave a message </font> |
|
OnClick
event with a Dynamic image: |
|
|
The following
example is a bit more complicated. It call's a
script on our site and return an image related to
the support status. If support is offline the
offline image is returned. If support is online the
online image is returnrd.
The script needs
two arguments,
your
Client ID and an
index. The images are
saved as pairs. The index lets the script know witch
of the paired images you have chosen. To see the
available images click here >
Images to choose from.
Width and height
dimensions are not necessary, but it may be better
to create a table and load the image into it. Use
the
>
Images to choose from. images sizes as guide.
|
|
|
<img
src='http://www.noa-soft.com/IsSupportOnline.php?ClientID=GBL9ZQRHS88Q7X&ImageIdx=1'
style="cursor:hand" onClick=
"javascript:LoadChat();"> |
Adding options to the above
script
The above function, with no added
parameters will load a client
chat with default settings. The default is an English interface. If you do
not need a none English interface or other options please skip to the
next installation section < Click to skip >.
Any added option should be inserted after
the ClientId value and before the closing ' character. The inserted
extra parameters are constructed from a separator, the & character,
a parameter name, and a value.
Added options:
To use a client chat with add a different language interface
then English add &CountryID=value
Change the value to one of the following:
-
es for Spanish client interface
-
da for Danish client interface
-
it for Italian client interface
-
de for German client interface
-
pt for Portuguese client interface
-
fr for French client interface
-
nl for Dutch client interface
-
English interface
is the default, no need to add any parameter for that !.
To hide the client e-mail editing box in
the sign in display add &HideEmail=yes
To display a phone number instead of e-mail editing box in
the sign in display add &ShowPhone=yes
To add a web site address (were the call
came from) notification at the PC support side add &WebAddr=value.
The value is your domain name or any data you wish to see at the
support side.
This is used when
you have one supporter that answers to more then one site and you
want to know from were the call come from.
The following display shows an example of
the function call with added Spanish client interface. The added
parameter is marked in red. The reason that
the 'http://www... ' is on a separate line is that no spaces are
allowed in that line. If you copy the text you can put it in one
long line.
This is all that is
needed in your web page !.
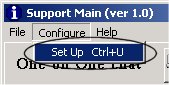
Support side setup
PC software setup
-
In the dialog you have five
tabs:

-
From the five tabs, the
Web and IP SetUp is the one
that needs most of the changes.
-
Update the Client ID that was
issued at the registration process.
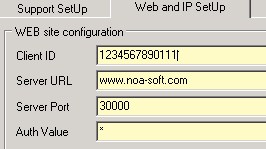
-
Set the Auth Value to zero
(0) As long as the system is free the Auth value will be
0. The Auth Value is seen as an *.
-
Update the mail server
settings. These setting are important and will be used
to mail the chat transcript to the remote client.

-
Finally, in the directory you
have created you will find a simple text file. The
filename is base_mail.txt
Open the file with a simple text editor (NotPad,
EditPad...). Edit the file content to reflect your own
company. Do not change the first
two lines in this file. The first line "Dear visitor,"
will be replaced with the remote client user name !
(e.g.: Dear Ron,).
The chat
transcript that will be sent to the remote client will be
attached to this simple text file.
The above
explanations is a very short version for the PC software
setup. The software is supplied with a help file. For
better understanding please read the help data. The
software is simple to use and in most parts is self
explanatory.
Hope you will
find this service useful as we think it is. Extra features
are planed to be added in a short time. Any input,
suggestions, comments, complaints... are more then
welcomed. Please use our forum
for that.
Top
 |